Contrary to the belief that Iyengar Yoga’s long holds are merely slow and passive, they are a potent technology for rewiring your body’s deep intelligence.
- Holding poses isn’t about endurance; it’s about “neuromuscular engraving,” creating precise, lasting alignment patterns that faster-paced styles only sketch.
- Props are not crutches for beginners; they are sophisticated feedback tools that awaken proprioception and enable deeper, more intelligent muscular action for all levels.
Recommendation: Shift your focus from the speed of your practice to the precision of your attention. This is the key to unlocking profound stability, awareness, and lasting change.
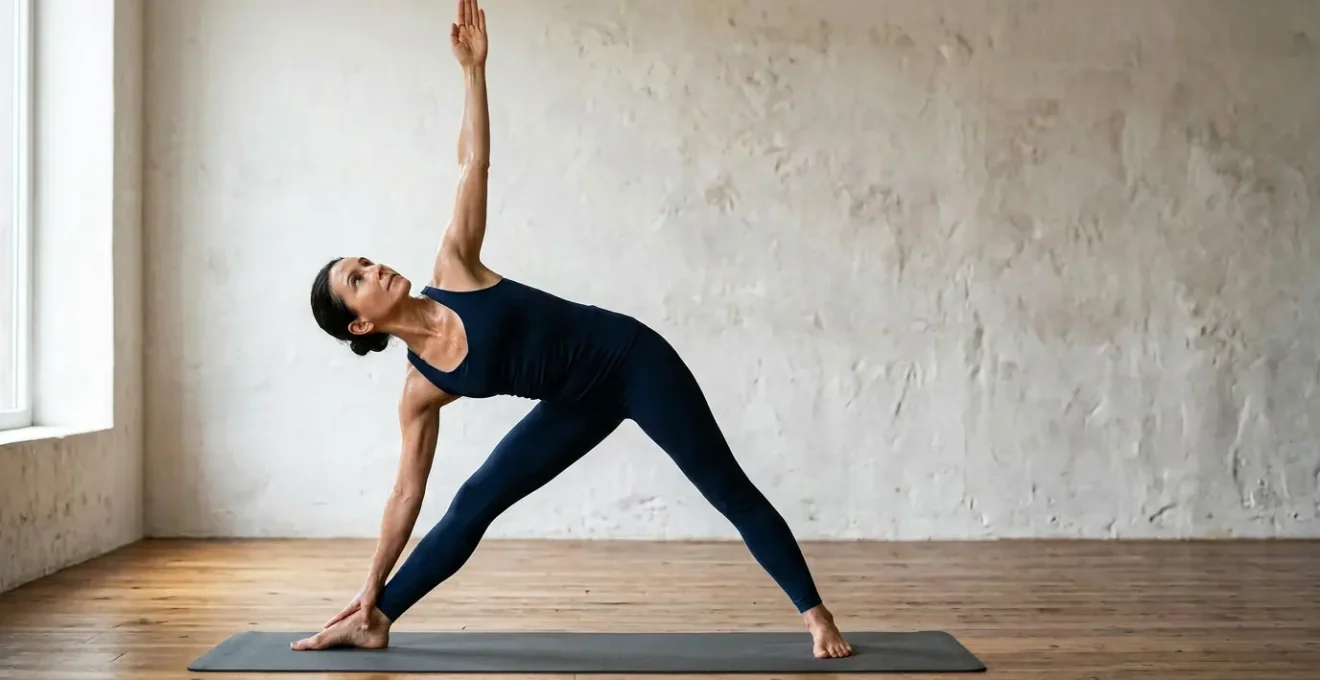
You’ve likely seen it: a room full of yoga practitioners, seemingly frozen in time. One person holds Warrior II for what feels like an eternity while a teacher makes meticulous adjustments. To an observer accustomed to the continuous motion of a Vinyasa class, this can seem perplexing, perhaps even boring. The common assumption is that Iyengar yoga is “slow,” a practice reserved for beginners, the elderly, or those recovering from injury. While it is exceptionally effective for these groups, this view misses the profound depth and intensity at the core of the method.
The truth is, the extended duration in a single asana is not about slowness; it’s about depth. It’s a deliberate strategy for a purpose that goes far beyond simply stretching a muscle. This method, pioneered by B.K.S. Iyengar, is a sophisticated system designed to do something much more fundamental: to retrain the nervous system, sharpen proprioceptive awareness, and build a form of deep bodily intelligence that transcends the yoga mat. It’s about moving from a state of simply “doing” a pose to truly “becoming” the pose, understanding its architectural integrity from the inside out.
This article deconstructs the Iyengar method’s focus on duration and precision. We will explore the “why” behind the props, the science of how long holds build superior alignment compared to flowing styles, and how these principles empower you to become your own best teacher. Prepare to see those 10 minutes in a single pose not as a test of patience, but as an investment in lasting transformation.
To fully grasp this methodical approach, this guide breaks down the core principles of the Iyengar method, from the intelligent use of props to the science of building stability. Explore the sections below to understand how precision and duration cultivate a deeper practice.
Summary: The Method Behind Iyengar’s Precision
- Why Does Iyengar Yoga Use So Many Props When Other Styles Use None?
- How to Choose Between a Block, a Strap or a Blanket for Your Tight Shoulders?
- Iyengar Sequences or Vinyasa Flow: Which Builds Better Alignment Over 6 Months?
- When Iyengar Alignment Cues Do Not Work for Your Body Structure
- How to Self-Correct Using Iyengar Principles When Practicing Alone at Home?
- How to Use Blocks to Improve Alignment Rather Than Compensate for Tightness?
- How Can a Bolster Transform Your Seated Forward Folds Even If You Are Flexible?
- Why Does Your Warrior II Still Feel Unstable After 2 Years of Regular Practice?
Why Does Iyengar Yoga Use So Many Props When Other Styles Use None?
The most visible distinction of an Iyengar class is the array of props: blocks, blankets, straps, bolsters, and chairs. The common misconception is that these are crutches, used only to make difficult poses accessible to beginners or the inflexible. While they do achieve this, their primary purpose is far more sophisticated. Props are not meant to help you “cheat” the pose; they are instruments to help you understand it. They function as an external teacher, providing tangible feedback that awakens your body’s internal awareness, or proprioception.
As one certified Iyengar instructor notes, “Often in Iyengar Yoga, using a prop has nothing to do with helping you ‘do’ the pose, but rather, it’s used to help you better understand the pose.” For instance, pressing your hand firmly into a block in Trikonasana (Triangle Pose) isn’t just about bringing the floor closer. It creates a circuit of action and reaction. The block’s firm surface provides clear sensory information, teaching your hand, arm, and shoulder how to engage correctly to create space in the torso. This active dialogue between your body and the prop is a hallmark of the method, ensuring that alignment is felt and learned, not just intellectually conceptualized. This approach is backed by evidence, as research published in the International Journal of Yoga found that props can significantly improve alignment and reduce the risk of injury during practice.
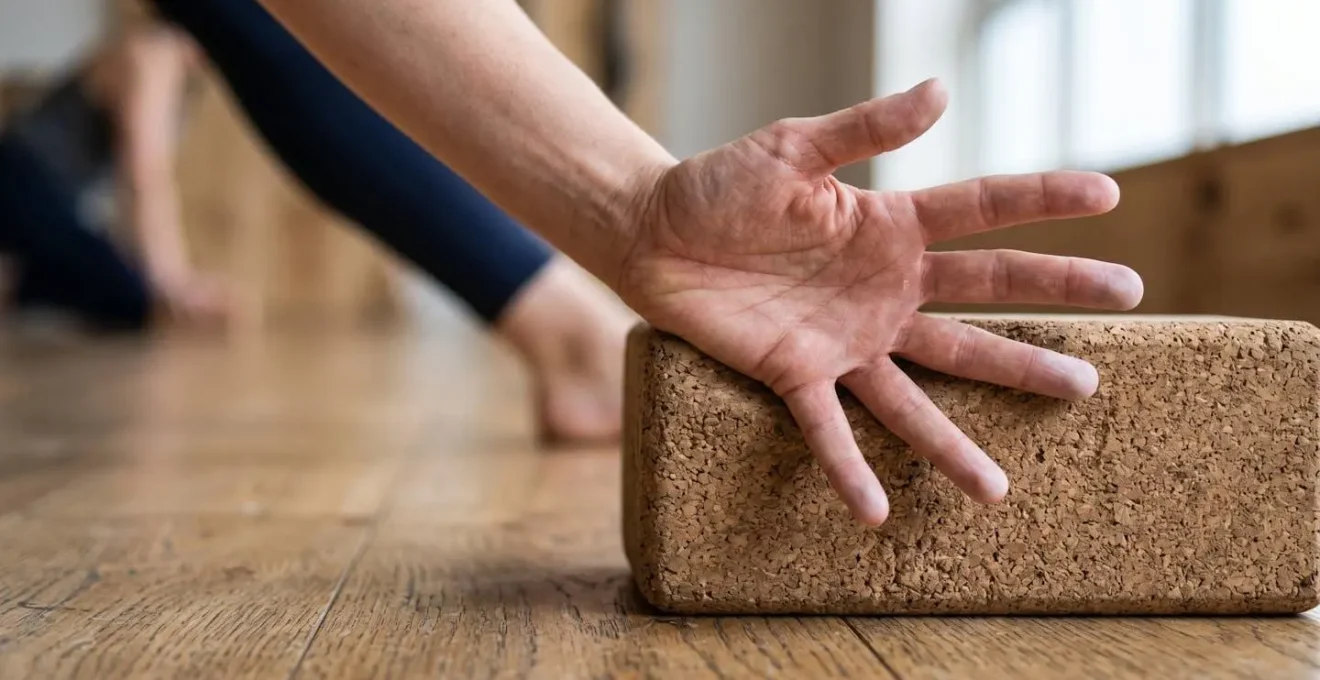
As the image above demonstrates, the prop becomes a tool for biofeedback. It makes the subtle, internal actions of a pose visible and tangible. By providing support, props also allow for longer holds, giving the mind and nervous system the time needed to penetrate deeper into the body, identify areas of dullness or resistance, and cultivate a refined somatic intelligence. Ultimately, props are not a sign of weakness; they are a sign of a smart, precise, and deeply inquisitive practice.
How to Choose Between a Block, a Strap or a Blanket for Your Tight Shoulders?
The intelligent use of props in Iyengar yoga moves beyond generic advice. It involves a diagnostic process to identify the specific nature of a limitation. For tight shoulders, simply grabbing any prop is not the answer. The choice between a block, strap, or blanket depends on whether the restriction is related to reach, structure, or a need for passive release. A methodical approach allows you to select the precise tool to address the root cause of your tightness, turning a limitation into an opportunity for learning.
For example, if you cannot clasp your hands behind your back in Gomukhasana (Cow Face Pose), is it because your muscles are too short (a “reach” issue) or because the bones of your shoulder joint are compressing? A strap is perfect for extending your reach and educating the muscles, while a block might be used to support the arm and prevent joint compression. A folded blanket placed under the hips can change the pelvic tilt, which in turn frees up the shoulder girdle. Each prop serves a distinct purpose, and learning to differentiate them is key to a sophisticated home practice.
Your Action Plan: Diagnosing Shoulder Restriction with Props
- Assess your limitation: Test your range of motion. Can you clasp your hands behind your back? If not, this indicates a ‘reach’ limitation, often related to muscular length. A strap is your primary tool here.
- Identify structural vs. soft tissue: If you feel a “bone-on-bone” sensation or sharp compression when attempting the movement, the limitation may be structural. Use a block for support to create space in the joint rather than forcing it.
- Define your nervous system goal: For a calming, restorative effect (activating the parasympathetic response), choose a blanket. Use it to create elevation and passive support, allowing the muscles to release without effort.
- Test movement plane restriction: For forward/back movements (sagittal plane), a strap is ideal. For side-to-side stability (frontal plane), a block provides a firm spatial reference. For twists (transverse plane), a blanket provides subtle elevation to ease rotation.
- Layer props strategically: Don’t be afraid to combine tools. In a supine twist, a blanket under the head and a strap around the arms can address multiple restrictions simultaneously, creating a more integrated release.
By following this diagnostic framework, you transform props from passive aids into active partners in your practice. This analytical approach is fundamental to the Iyengar method, empowering you to make informed choices that respect your unique anatomy and accelerate your understanding of complex poses.
Iyengar Sequences or Vinyasa Flow: Which Builds Better Alignment Over 6 Months?
This question often sparks debate, but it stems from a misunderstanding of their respective goals. Vinyasa flow, with its continuous movement synchronized with breath, is excellent for building cardiovascular endurance and learning the transitions *between* poses. In contrast, the Iyengar method, with its long, static holds, is designed to build a deep, unshakable understanding of the internal architecture *of each pose*. Over a period of six months, a practitioner curious about mastering alignment will find the Iyengar method offers a more direct and lasting path.
The difference lies in how each method interacts with the nervous system. As a neuroscience research team on the mechanisms of yoga explains, “Iyengar’s long holds ‘engrave’ precise neuromuscular pathways for a single pose, while Vinyasa’s repetition ‘sketches’ the connections between many poses.” The long hold is a form of deep learning. It gives the brain enough time to receive clear signals from the muscles and joints, refine the instructions it sends back, and create a strong, stable blueprint for the asana. This process dramatically improves proprioception—the body’s awareness of itself in space. In fact, a systematic review of proprioceptive training demonstrated that targeted exercises can lead to a 43% to 58% improvement in joint position sense.
While a Vinyasa practitioner might perform Warrior II twenty times in a class, an Iyengar student might hold it once for five minutes. In that time, the Iyengar student has methodically worked on grounding the back foot, rotating the front thigh, extending the arms, and stabilizing the core—all separate actions integrated into one coherent whole. This neuromuscular engraving creates a form of muscle memory that is far more permanent and precise than the “sketch” created by rapid repetition. Therefore, for the specific goal of building better alignment, the focused, deep dive of Iyengar sequencing yields more profound and sustainable results over time.
When Iyengar Alignment Cues Do Not Work for Your Body Structure
One of the most intimidating aspects of Iyengar yoga can be its precise alignment cues. Instructions like “tuck your tailbone” or “align your front heel with your back arch” are iconic. But what happens when these cues don’t feel right, or even cause discomfort? This is where the true intelligence of the method reveals itself. The goal is not to blindly follow a prescription but to understand the underlying principle the cue is trying to achieve. A skilled teacher, and eventually the practitioner, learns to adapt the form to honor their unique anatomical structure.
Every human body is different. The angle of the femoral head in the hip socket, the degree of spinal curvature, and limb-to-torso ratios vary significantly from person to person. A universal cue, therefore, cannot possibly work for every body. If “tucking the tailbone” causes your lower back to flatten and feel compressed, the principle behind the cue—to create length in the lumbar spine—has been lost. The instruction has failed. In this moment, the practice asks you to become a scientist of your own body.
As a consensus of experienced practitioners highlights, it’s about “Principles over prescriptions: Instead of ‘tuck your tailbone,’ focus on ‘create space in the joint’ – this allows you to apply the principle when the prescription fails due to unique anatomy.” This shift in mindset is liberating. Instead of forcing your body into a preconceived shape, you use the asana as a framework to explore what creates stability, freedom, and space in your own structure. The alignment cues are the starting point of an investigation, not the final destination. The ultimate aim is to awaken a somatic intelligence that can apply these universal principles to your individual form.
How to Self-Correct Using Iyengar Principles When Practicing Alone at Home?
A common concern for yoga practitioners is how to maintain alignment and continue to deepen their practice without the watchful eye of a teacher. The Iyengar method directly addresses this by systematically training you to become your own instructor. The emphasis on precision, props, and long holds is designed to cultivate an acute inner awareness. At home, as one instructor puts it, “props also act as silent teachers, giving you feedback about your posture and alignment.” By using these tools and specific self-study techniques, you can continue to refine your practice with confidence.
Developing this “internal teacher” involves moving beyond simply performing a pose and learning to actively listen to your body’s feedback. This requires specific, methodical techniques for self-diagnosis. Instead of guessing if your hips are level in Trikonasana, you can practice against a wall and feel the objective feedback of which parts of your body are making contact and which are not. This turns your environment into a source of clear, unbiased information. By cultivating this sensitivity, your home practice transforms from simple repetition into a rich field of self-discovery and continuous refinement.
Here are some powerful self-diagnostic methods to integrate into your home practice:
- The Rebound Effect: Hold a pose, like a standing twist, for one minute on one side. Release completely and stand in Tadasana (Mountain Pose). Close your eyes and notice the energetic “echo.” Which side of your body feels more open, longer, or more vibrant? This residual sensation reveals where you were holding hidden tension and where you successfully created space.
- The Wall as an Objective Teacher: Practice Tadasana with your heels, sacrum, and shoulder blades touching a wall. Notice which body parts struggle to make contact. These gaps reveal your habitual postural misalignments in a way that is impossible to ignore.
- Breath as an Alignment Detector: In any held pose, scan your body and notice where your breath feels restricted. A restriction on the right side of your ribcage often indicates a collapse in that area or an over-rotation to the left. Consciously direct your breath into the restricted area to help it open and find better alignment.
- The One-Minute Pose Film Study: Record yourself holding a key pose for 60 seconds. Watch the video without judgment. Compare the visual reality of your pose to the “felt sense” you had while holding it. This gap between what you see and what you feel is precisely where proprioceptive recalibration is needed.
How to Use Blocks to Improve Alignment Rather Than Compensate for Tightness?
In many yoga classes, a block is handed to a student with tight hamstrings in a forward fold with the simple instruction to “bring the floor closer.” While this provides support, it positions the block as a passive compensation for a lack of flexibility. The Iyengar method flips this concept on its head. Here, a block is more often used as a tool to create action and engagement. It serves as a tangible object to push against, pull on, or squeeze, awakening dormant muscles and teaching the body a more intelligent way to create stability.
A classic example is placing a block between the thighs in Utkatasana (Chair Pose) or Tadasana (Mountain Pose). The goal isn’t to hold the block passively. The instruction is to actively squeeze the block, engaging the adductor muscles of the inner thighs. This single action has a powerful chain reaction: it helps to internally rotate the femurs, broaden the sacrum, and engage the deep core muscles. The block doesn’t make the pose easier; it makes it more intelligent and integrated. It teaches an action that, over time, becomes part of the body’s muscular memory, even when the block is removed.

This principle of active engagement transforms the prop from a crutch into a bridge. As the teaching team at Iyengar Yoga Source states, “A prop is not a shortcut; it’s a bridge—one that allows you to refine postures, hold them longer, and practice with greater awareness.” Using a block to push against a wall in a standing pose, for instance, can teach the serratus anterior muscle how to stabilize the shoulder blade. This is not compensating for weakness; it is actively training for strength and stability. The block becomes a temporary partner that educates the body, building the architectural integrity that will eventually support the pose on its own.
How Can a Bolster Transform Your Seated Forward Folds Even If You Are Flexible?
For a flexible practitioner, the idea of using a large bolster in Paschimottanasana (Seated Forward Fold) can seem counterintuitive. If you can already place your chest on your thighs and your head on your shins, what more could a prop possibly offer? This is where the Iyengar method reveals its subtlety. For the flexible body, a bolster is not used to achieve more range of motion, but to cultivate a deeper state of release and surrender. It shifts the goal from active, muscular stretching to passive, neurological calming.
Even in a flexible body, holding a deep forward fold requires a certain level of muscular effort to control the descent and stabilize the position. There is often a low-grade, unconscious tension held in the deep muscles of the back and hips. When you place a bolster across your thighs and rest your entire torso upon it, you provide the body with a profound sense of support. This signals to the nervous system that it is safe to let go completely. As Sarah Powers, founder of Insight Yoga, explains, “When the bones feel supported, the muscles can relax – even highly experienced practitioners can discover muscles they didn’t know they were engaging.”
Resting on the bolster changes the entire experience of the pose. The breath deepens, the nervous system shifts from a “doing” state (sympathetic) to a “being” state (parasympathetic), and the mind has a chance to become quiet and observant. This supported position allows you to stay in the pose for an extended period—five, ten, or even fifteen minutes—without strain. In this state of supported stillness, the deep connective tissues (fascia) begin to slowly release. For the flexible practitioner, the bolster is not a tool to get “deeper” into the pose physically, but to access a deeper layer of mental quietude and fascial release that is often inaccessible in an unsupported, active stretch.
Key Takeaways
- The long holds in Iyengar yoga are a deliberate technique for “neuromuscular engraving,” creating deep, lasting alignment patterns in the body’s intelligence.
- Props are not crutches but active learning tools that provide biofeedback, awaken proprioception, and teach intelligent muscular action.
- True alignment comes from understanding universal principles (like creating space) and applying them to your unique anatomy, rather than blindly following prescriptive cues.
Why Does Your Warrior II Still Feel Unstable After 2 Years of Regular Practice?
It’s a common frustration among dedicated yoga students: despite years of regular practice, certain fundamental poses like Virabhadrasana II (Warrior II) never feel truly solid. You might experience a wobble in the front knee, a strain in the hip, or a general sense of precariousness. Often, the issue is not a lack of strength or flexibility, but a deficit in proprioception and a reliance on alignment cues that may not be optimal for your body’s structure. The long, investigative holds of the Iyengar method are designed to diagnose and correct precisely these kinds of chronic instabilities.
Stability in any pose is a conversation between your mind and your body. As one teacher specializing in balance notes, “When the mind scatters, the body wobbles.” However, the mind needs accurate information to work with. This information comes from proprioception, your body’s internal sense of its position and movement. Significantly, according to researchers studying sensory systems, proprioception contributes more to balance than visual inputs. If your proprioceptive map of Warrior II is blurry or inaccurate, no amount of muscular effort will make the pose feel stable. The long holds of Iyengar yoga act like a high-resolution scanner, giving your nervous system the time it needs to build a clear, detailed, and accurate map of the pose.
Case Study: The Biomechanics of Instability in Warrior II
The common cue to “align the front heel with the back arch” can be a primary source of instability. Biomechanical research on Warrior poses revealed that for many body types, this alignment creates an excessively narrow base of support. This forces the body into compensatory torquing patterns throughout the kinetic chain, particularly in the hips and knees, to maintain balance. Researchers documented that widening the stance by aligning the front heel with the *back heel* (not the arch) significantly improved stability and reduced harmful joint loading. The study concluded that a one-size-fits-all alignment cue is a major contributor to chronic instability, highlighting the need for practitioners to find a stance width that suits their individual hip structure.
This case study reveals that your instability might not be a personal failing, but the result of following a cue that creates a weak foundation for your specific anatomy. The Iyengar method encourages this kind of investigation. By holding the pose, you have the time to experiment: What happens if I widen my stance? If I press more firmly into the outer edge of my back foot? This process of micro-adjustment and sensory feedback is how you rebuild the pose on a foundation of true architectural integrity, transforming a wobbly posture into a source of unshakable strength.
The journey through the Iyengar method is a progressive education in self-awareness. It teaches you that the answers are not found in faster movement or more complex sequences, but in the quiet, sustained attention you bring to the foundation of each pose. By embracing this methodical approach, you cultivate an internal teacher capable of navigating any asana with intelligence and precision. To put these principles into practice, the next logical step is to begin building your own sequences with this newfound focus on stability and awareness.