Contrary to common belief, instability in long-held yoga poses isn’t a sign you need more strength or flexibility. The real issue is often a disconnected “proprioceptive dialogue” between your brain and your body. This article reframes your practice, moving you beyond simply mimicking shapes and teaching you how to use precise, sensory feedback to build unshakable stability from the ground up, transforming your poses from the inside out.
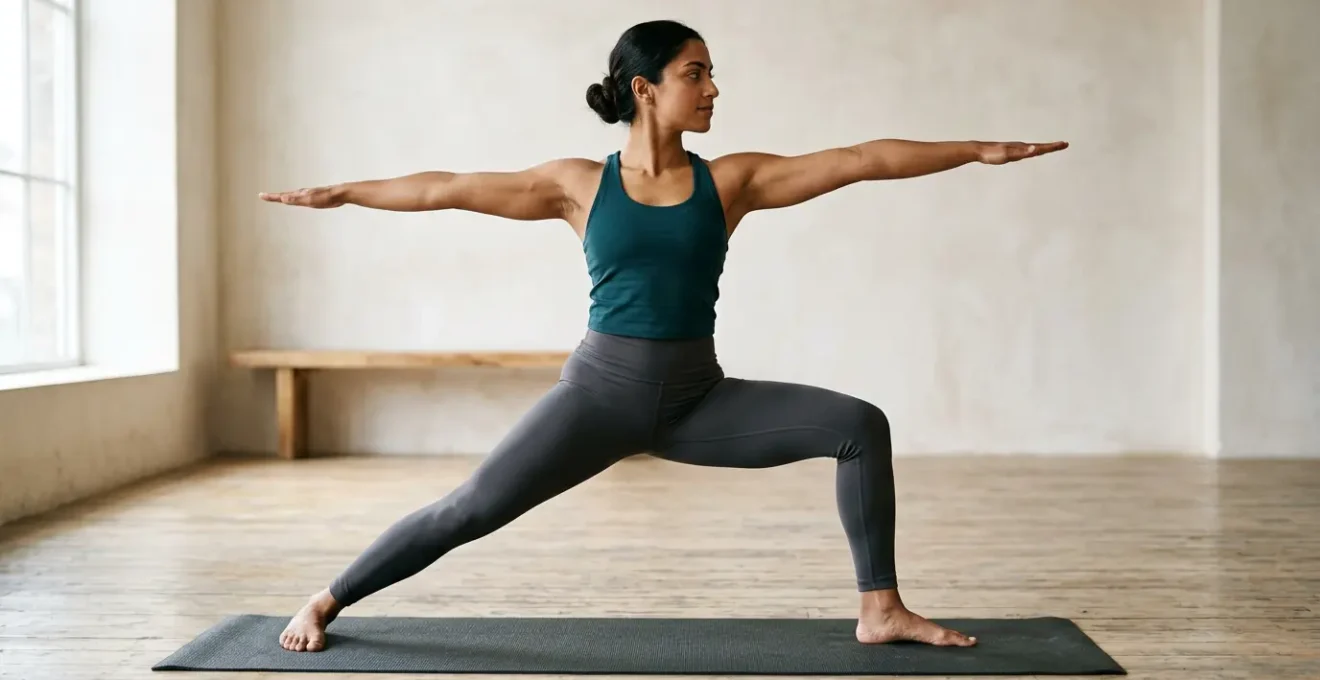
You unroll your mat, week after week. You know the sequence, you know the cues, you can even anticipate your teacher’s corrections. Yet, when you step back into Warrior II, there it is again: a subtle wobble, a feeling of gripping rather than grounding, a sense that you’re holding on for dear life instead of radiating power. It’s a common and deeply frustrating plateau for the intermediate practitioner. You’re doing the work, so why aren’t you seeing the progress?
The usual advice to “engage your core” or “press into your feet” feels hollow because you’re already trying to do just that. You’ve followed countless online tutorials and focused on your breath, but the fundamental instability remains. It’s easy to conclude that you’re just not strong enough, flexible enough, or perhaps that yoga “stability” is a myth reserved for the hyper-mobile few.
But what if the key wasn’t about adding more force, but about improving the quality of information? The secret to transforming your wobbly Warrior doesn’t lie in more effort, but in refining your body’s internal GPS: your proprioceptive system. This is the sensory network that tells your brain where your limbs are in space without you having to look. Your instability is a sign of a fuzzy signal, not a lack of power.
This guide will deconstruct why you feel stuck and give you the technical tools to break through. We will explore the true prerequisites for stability, how to use props as biofeedback tools, and why the smallest adjustment can change everything. It’s time to stop just doing the poses and start truly understanding them.
Table of Contents: Why Your Warrior II Feels Unstable and How to Fix It
- What Must Your Standing Poses Demonstrate Before Attempting Arm Balances?
- How to Use Blocks to Improve Alignment Rather Than Compensate for Tightness?
- Are You Engaging Your Legs or Just Gripping? How to Tell the Difference in Triangle Pose
- Why Group Classes Alone Cannot Refine Your Alignment After the First Year
- How to Structure a 30-Minute Home Practice That Addresses Your Specific Weaknesses?
- What Happens to Your Knee When You Rotate Your Thigh 5 Degrees Outward in Warrior?
- How to Progress from Standing on One Leg to Eyes-Closed Balance in 8 Weeks?
- Why Does Moving Your Foot 2cm Completely Change How a Pose Feels?
What Must Your Standing Poses Demonstrate Before Attempting Arm Balances?
Many practitioners view standing poses as a warm-up for more “advanced” postures like arm balances. This is a fundamental misunderstanding. Arm balances aren’t just about upper body strength; they are standing poses on your hands. Before you can fly, your standing poses must demonstrate one critical quality: integrated stability. This isn’t about rigid stillness, but a dynamic, intelligent equilibrium that starts from the ground up. It’s the ability to distribute weight, engage the entire kinetic chain, and maintain structural integrity without gripping.
This stability is a direct result of a well-honed proprioceptive dialogue. It’s your nervous system’s ability to sense the floor, your muscles’ capacity to respond with micro-adjustments, and your brain’s skill in processing this constant stream of information. A powerful standing pose shows that you can create a stable base and build a strong structure upon it. When you can hold Warrior II or Triangle with power, ease, and distributed effort, you are proving you understand the core principles of tension and balance required for postures like Crow or Side Plank.
The link between this internal awareness training and physical skill is not just theory. In fact, systematic research on proprioceptive training shows a 46% average improvement in proprioceptive performance and a corresponding 45% improvement in motor performance. By refining your standing poses, you are not just getting better at standing; you are upgrading the foundational software your body uses for all movement, making those elusive arm balances a natural next step, not a distant goal.
How to Use Blocks to Improve Alignment Rather Than Compensate for Tightness?
Yoga blocks are perhaps the most misunderstood prop in the studio. For many, they are seen as a crutch—a tool for those who aren’t “flexible enough” to reach the floor. This perspective completely misses the block’s most powerful function: it’s not a compensator, it’s a proprioceptive feedback tool. The goal isn’t just to touch something; it’s to teach your body *how* to engage with intelligence and integrity, regardless of your flexibility.
Instead of passively resting your hand on a block in Triangle Pose, change your intention. Think of it as a button you need to actively press. Push down into the block with your hand. Spread your fingers. Feel the line of energy and muscular engagement travel up your arm, through your shoulder, and into your core. The block provides a firm, reliable surface that your mechanoreceptors can push against, sending clear signals of “active engagement” to your brain. This is a world away from the dull, collapsing sensation of passively dropping your hand to the floor just for the sake of it.
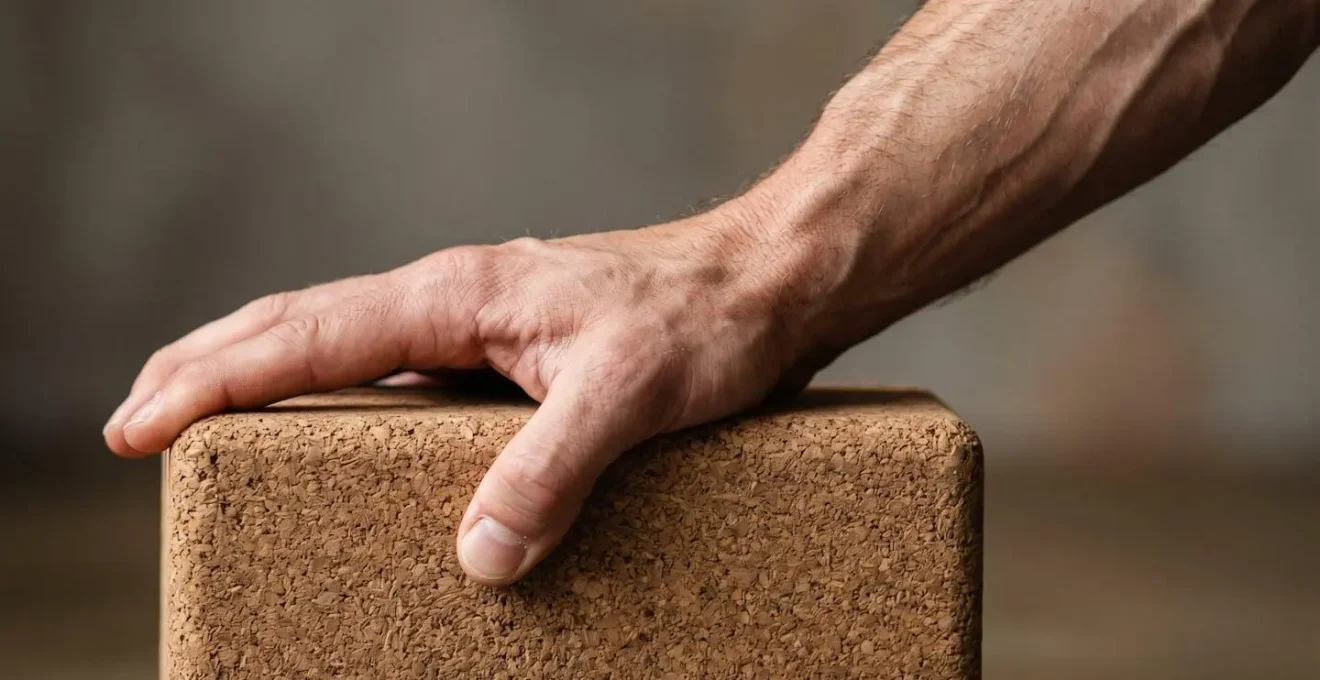
As you can see, the active pressing creates a clear line of force. This turns the block from a passive support into an active dialogue partner. It helps you build the neuromuscular mapping for correct alignment. You are no longer compensating for tightness; you are actively teaching your nervous system the feeling of a supported, engaged, and integrated posture.
Case Study: Props as Biofeedback for Functional Improvement
This principle extends beyond the yoga mat. As a 12-week study on older adults demonstrated, a proprioceptive exercise program that “utilized props and feedback tools” led to significant improvements in functional mobility, balance, and musculoskeletal endurance. The props were not used to make things easier, but to provide the sensory feedback necessary to enhance body awareness and neuromuscular control, proving their value as teaching instruments.
Are You Engaging Your Legs or Just Gripping? How to Tell the Difference in Triangle Pose
You hear the cue “engage your legs” in every class, but what does it actually feel like? For many, the response is to simply tense everything. This is gripping: a non-specific, brute-force co-contraction of agonist and antagonist muscles. It creates a semblance of stability but it’s inefficient, exhausting, and it short-circuits the flow of energy. Engagement, on the other hand, is intelligent, targeted, and dynamic. It’s the difference between a clenched fist and a hand that is ready to play a piano.
How can you tell the difference in a pose like Trikonasana (Triangle Pose)? First, notice your breath. Gripping often leads to breath-holding or shallow breathing as your entire system tenses. True engagement allows for deep, steady diaphragmatic breathing. Second, notice the sensation. Gripping feels like a hard, brittle lockdown, particularly around the joints. Engagement feels like an energetic “hum” throughout the muscles, a feeling of being both grounded and lifted simultaneously. Think of “hugging the muscles to the bone” rather than “squeezing the joints.”
A key indicator is muscle utilisation. As practice deepens, the way muscles are used changes significantly. A 2014 study on muscle utilisation in yoga found a significant interaction between skill level and muscle activation in key stabilising muscles. This means experts don’t just use *more* muscle; they use muscle *differently* and more efficiently. They have refined the neurological pathways to activate only what is necessary, creating stability with minimal effort. The gripping you feel is often a compensation strategy, an attempt by the body to create stability in the absence of a clear neuromuscular map.
Why Group Classes Alone Cannot Refine Your Alignment After the First Year
Group yoga classes are a fantastic gateway. They provide structure, community, and expert guidance that is essential in the first year of practice. During this phase, you learn the fundamental shapes, the sequencing, and the basic language of yoga. However, after that initial period, the very nature of a group class can become a limiting factor in your progression, especially when it comes to refining alignment and proprioception.
The reason is simple: a group class is, by definition, a generalized experience. A teacher leading a room of 20 or 30 people must provide cues that work for the majority. They can offer general corrections, but they cannot possibly give the sustained, individualized attention needed to deconstruct your unique movement patterns and kinesthetic blind spots. Your persistent wobble in Warrior II isn’t a “big picture” error; it’s a nuanced habit—perhaps a lazy outer hip, a slight pronation of the ankle, or an inefficient firing pattern of your glutes—that requires specific, targeted intervention to correct.
This is where the value of focused training becomes undeniable. Research consistently shows that individualized or specific training protocols yield superior results in motor control and balance. For instance, research comparing yoga meditation programs found significant between-group differences in balance (with a large effect size of d=0.77) for those in more focused programs. A group class is designed to maintain a flow, not to stop and workshop one person’s hip rotation for ten minutes. To truly refine your practice, you must take the general knowledge from the classroom and apply it in a laboratory of one: your own body, during your own time.
How to Structure a 30-Minute Home Practice That Addresses Your Specific Weaknesses?
The solution to the group class limitation is a targeted home practice. This doesn’t mean replicating a 90-minute studio class in your living room. It means using a short, focused session as a surgical tool to address your specific instabilities. A 30-minute practice with clear intention is far more effective for breaking a plateau than another generic vinyasa flow. The goal is to move from “doing yoga” to “studying your body through yoga.”
Your home practice becomes your personal movement laboratory. Here, you can pause, rewind, and experiment in ways that are impossible in a group setting. You can hold a pose and, instead of just enduring, you can investigate. Where is the weight? What happens if I press my back foot down more? What if I internally rotate my back thigh a fraction of an inch? This is where true learning happens—in the quiet, inquisitive moments of self-study.
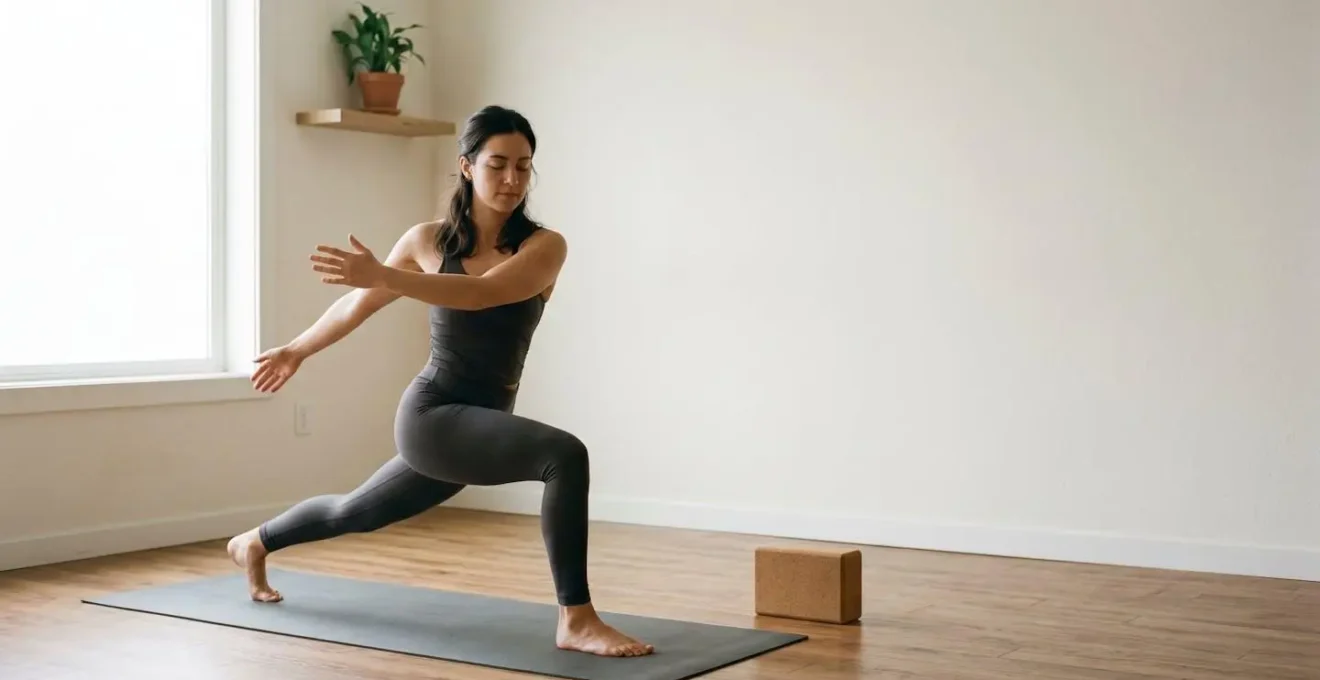
The structure should be simple and follow a test-and-retest model. Begin by exploring your “problem pose.” Don’t judge it, just observe it. Then, spend the bulk of your time on specific drills and component parts that address the weakness you identified. Finally, return to the original pose and notice the change. This creates a powerful feedback loop that rewires your neuromuscular patterns with remarkable efficiency.
Your Action Plan: The 30-Minute Proprioceptive Audit
- Test-Retest Framework: Perform your problem pose (e.g., Warrior II) for 30 seconds. Identify the specific instability or weakness. Where does the wobble start? Where do you feel the strain?
- Targeted Component Training: Dedicate 10-15 minutes to isolated drills addressing the identified weakness. If your hips are unstable, practice clamshells or single-leg glute bridges. If it’s your ankle, practice single-leg balances on different surfaces.
- Integration Phase: Spend 10 minutes applying the newly activated patterns. Move slowly through 2-3 key standing poses that relate to your problem pose, focusing on recreating the sensation of engagement from the drills.
- Reassessment: Return to the original problem pose for 30 seconds. Consciously note the differences in sensation, stability, and control. What has changed?
- Consistency Note: Remember that effective proprioceptive training protocols span 6-12 weeks of consistent practice. This is about building a new neurological habit, not seeking a one-time fix.
What Happens to Your Knee When You Rotate Your Thigh 5 Degrees Outward in Warrior?
It’s a tiny adjustment, almost invisible from the outside. A mere 5-degree external rotation of your front thigh in Warrior II. Yet, this small movement is the difference between a pose that builds integrity and one that risks long-term joint damage. To understand why, we must look at the biomechanics of the knee joint. The knee is a hinge joint, designed primarily for flexion and extension (bending and straightening). It has a very limited capacity for rotation, especially when bearing weight.
When your front knee collapses inward in Warrior II—a very common misalignment—it’s because the external rotators of the hip (like your gluteus medius) are not doing their job. This forces the knee into a valgus position (knock-kneed), placing immense stress on the medial collateral ligament (MCL) on the inner knee. The 5-degree outward rotation of the thigh isn’t just an aesthetic choice; it’s a fundamental action of stability. This action, initiated from the hip, aligns the femur (thigh bone) correctly over the tibia (shin bone). This allows the knee to function as the stable hinge it is designed to be, tracking safely over the center of the ankle.
As one alignment specialist emphasizes in their analysis of Warrior II, “The knee NEEDS to remain directly over the ankle. Perhaps, pushing more towards the middle-little toe edge of the foot. This bent leg is in external rotation so the glutes and outer thigh on that leg need to be firing.” This is the essence of proprioceptive dialogue: sensing the inward drift of the knee and consciously responding with an outward rotation from the hip, powered by the glutes. This action doesn’t just protect your knee; it transforms the pose from a passive stretch into an active, integrated expression of strength.
How to Progress from Standing on One Leg to Eyes-Closed Balance in 8 Weeks?
Standing on one leg is a challenge of proprioception. Standing on one leg with your eyes closed is a challenge of proprioception *and* your vestibular system. When you remove visual input, your brain becomes almost entirely reliant on the signals from your inner ear (vestibular system) and the sensory receptors in your joints and muscles (proprioception) to keep you upright. Progressing to this level is a systematic process of refining the signal-to-noise ratio in your nervous system.
The journey from eyes-open to eyes-closed balance can be structured over an 8-week period by progressively challenging your stability. This isn’t about simply gritting your teeth and hoping for the best; it’s about gradual exposure to instability to make your stabilising system smarter and more reactive. The goal is to spend just enough time at the edge of your balance to challenge the system, but not so much that you become frustrated or create a fear response.
This process of gradual adaptation is incredibly effective. For example, a controlled study on balance training found that 10 weeks of training not only improved balance but also “reduced overactive proprioceptive feedback and restored vestibular function.” In essence, the training taught the nervous system to be less reactive to minor wobbles and to trust the more reliable signals. Your 8-week plan is a way to replicate this in your own practice:
- Weeks 1-2: Solidify Your Base. Practice Tree Pose on the floor with eyes open for 30-60 seconds. Focus on a steady gaze (drishti) and the active yielding of your standing foot.
- Weeks 3-4: Introduce Instability. Practice Tree Pose on a folded blanket or yoga mat to challenge your ankle stability. Keep your eyes open.
- Weeks 5-6: Reduce Visual Reliance. Return to the floor. Practice Tree Pose while shifting your gaze—up, down, left, right. Then, try briefly closing your eyes for 1-2 seconds at a time.
- Weeks 7-8: Full Immersion. With your foot firmly on the floor, find your Tree Pose and then, with intention, close your eyes. Accept the wobbles. Notice how your foot and ankle become incredibly active. Aim for 10 seconds, then 20, then 30.
Key Takeaways
- True stability comes from refined proprioception, not just brute strength. Your instability is a sign of a fuzzy nerve signal, not weak muscles.
- Use props like blocks as active feedback tools to teach engagement, not as passive crutches to compensate for a lack of flexibility.
- Focus on targeted home practice to address your unique weaknesses. A 30-minute ‘proprioceptive audit’ is more valuable than a generic 90-minute flow for breaking through plateaus.
Why Does Moving Your Foot 2cm Completely Change How a Pose Feels?
It’s an experience every dedicated yoga practitioner has had. You’re in a pose, feeling relatively stable, and the teacher offers a tiny physical adjustment—moving your back foot just two centimeters—and suddenly, the entire posture transforms. It can feel stronger, more grounded, or perhaps completely unravel. This isn’t magic; it’s neurology. That miniscule shift has provided your brain with a completely new set of data, and the change in feeling is your nervous system’s response to this new information.
The reason lies in the anatomy of your feet. As physical therapy research highlights, the experience is deeply rooted in our biology.
The soles of the feet are densely packed with mechanoreceptors. A 2cm shift stimulates a different set of these sensors, sending a completely new map of information to the brain about your position in space.
– Physical therapy research, Balance & Proprioception Training principles
Think of the sole of your foot as a high-resolution satellite map. Every square millimeter contains sensors that detect pressure, stretch, and vibration. When you move your foot, you are essentially repositioning the satellite, bringing a different part of the landscape into sharp focus. That 2cm shift might move your weight from a dense cluster of receptors on the ball of your foot to a different cluster along the outer edge. This new input forces your brain to recalculate everything: how to activate your arch, stabilise your ankle, engage your shin, and rotate your hip. It’s a chain reaction of recalibration that travels all the way up your body.
This is why precision is so paramount in a refined yoga practice. It’s also why developing sensitivity through proprioceptive work is so transformative. The better you become at listening to these subtle signals, the more you can make these micro-adjustments for yourself. You become your own teacher, capable of navigating your body’s internal landscape with an increasingly detailed and accurate map. The wobble in your Warrior II is your body asking for a clearer signal. Learning to adjust your position by mere centimeters is how you begin to provide it.
Your journey to a stable Warrior II is not a pursuit of a static, perfect shape, but an ongoing exploration of this dynamic, sensory conversation. Approach your next practice not as a test of your strength, but as an opportunity to listen more closely. Use these principles to investigate, to experiment, and to refine your own unique internal map. This is where the true practice begins.