Constant foam rolling isn’t working because your neck pain is rarely a neck problem—it’s a symptom of a systemic imbalance that rolling the sore spot can actually make worse.
- Much of what you feel as “tightness” is actually “protective tension,” your body’s intelligent strategy to stabilize an area. Aggressively massaging it can be counterproductive.
- Effective relief comes from a “Release-Activate-Reposition” strategy: release the actual source of the pull (often tight chest muscles), activate the weak opposing muscles (mid-back), and reposition your posture.
Recommendation: Stop chasing the pain in your neck and start addressing the postural patterns that put the strain there in the first place.
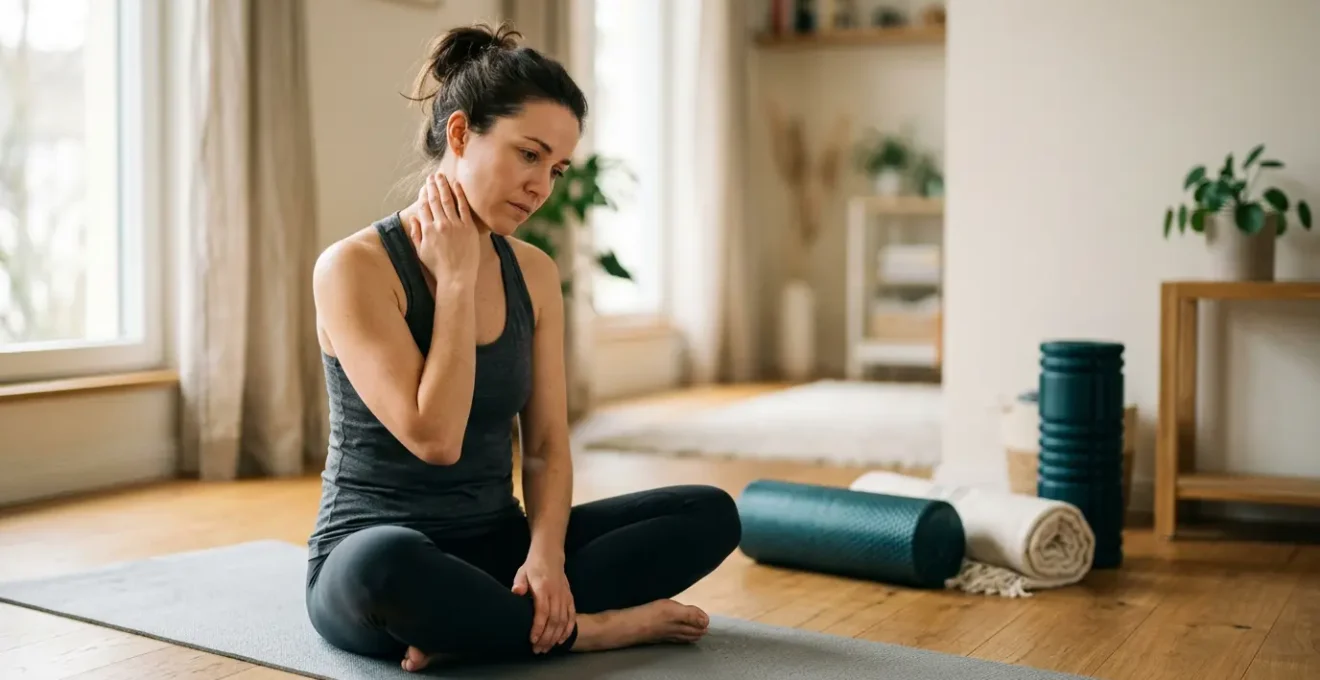
You’ve been diligent. Every day, you grab your foam roller or lacrosse ball, find that agonizing knot at the base of your neck, and work on it. You breathe through the discomfort, convinced that more pressure and more time will finally break it up. Yet, hours later, or the next morning, the same deep, nagging ache is back. It’s a frustrating cycle that leads many to believe they’re just not rolling hard enough or long enough. You might even have a collection of massage guns, spiky balls, and other myofascial release tools, yet the fundamental problem remains.
The common advice is to simply “release tight muscles.” But this advice fails to ask the most important question: why is that muscle tight in the first place? What if that tension isn’t the problem, but a symptom? What if that knot you’re tirelessly attacking is actually a form of protective tension, a smoke alarm your body is sounding to signal a fire elsewhere? This isn’t just about the neck; it’s a systemic issue involving everything from your desk posture to the way you breathe.
The truth is, effective self-treatment is less about brute force and more about intelligent diagnosis. It requires a shift in perspective: from attacking the victim (your sore neck) to identifying the culprit (the systemic imbalances pulling it out of alignment). This article will dismantle the “more is better” myth of foam rolling. We won’t just offer different techniques; we will provide a new framework for understanding your pain. You’ll learn to differentiate between tissues, choose the right tool for the right job, and adopt a corrective strategy that creates lasting change instead of temporary relief.
This comprehensive guide will walk you through a corrective and empowering process. You’ll learn how to diagnose your tension, select the appropriate tools and pressure, and integrate a complete routine that addresses the root cause of your chronic neck pain. Let’s explore the path to genuine, sustainable relief.
Summary: A Corrective Guide to Understanding and Relieving Persistent Neck Pain
- How Do You Know if Your Knots Need Massage or Need to Be Left Alone?
- Tennis Ball, Foam Roller or Massage Gun: Which Works Best for Upper Back Knots?
- How Hard Should You Press on Trigger Points Without Causing Bruising?
- Should You Foam Roll Before or After Your Yoga Practice for Best Results?
- How to Address Desk Worker Tension Spots in Under 10 Minutes Daily?
- How Can You Tell if Your Tightness Is Muscle, Fascia or Nerve Tension?
- Do You Really Need All Those Props or Can You Start With Just a Mat?
- How to Choose Between Sports Massage and Deep Tissue When You Have Chronic Back Pain?
How Do You Know if Your Knots Need Massage or Need to Be Left Alone?
The first and most critical step in self-treatment is learning to listen to your body’s signals. Not all tension is created equal, and treating every knot with aggressive massage can be counterproductive. The key is distinguishing between a dysfunctional muscle that needs release and a muscle providing protective tension to stabilize an unstable joint. Massaging the latter is like removing the emergency brake on a car parked on a hill.
Your nervous system provides clear feedback. A sensation that is a deep, relieving, “good hurt” ache is generally a sign of an active trigger point that will respond well to pressure. This is the feeling you can breathe through. Conversely, any sensation that is sharp, shooting, electric, or tingling is a major red flag. This indicates nerve involvement, and applying direct pressure can worsen the irritation. If you feel this, stop immediately. True active trigger points produce immediate muscular pain and referred pain to other predictable areas, a sign that you’ve found a relevant spot.
A simple self-triage framework can guide you:
- Assess Sensation Quality: Is it a deep ache (good) or sharp/electric (bad)? If you have to hold your breath, it’s too much.
- Apply the ‘Press & Hold’ Test: Press gently for 10-15 seconds. Does it reproduce your familiar pain pattern elsewhere? If yes, it’s an active trigger point worth treating.
- Evaluate Functional Context: Is the joint next to the tight muscle hypermobile or unstable? The tightness might be a smart protective mechanism.
- Monitor Muscle Response: A “good” knot will soften under sustained pressure (30-90 seconds). A muscle that fights back, getting tighter or more painful, is signaling it needs to be left alone.
By learning to interpret these signals, you shift from blindly attacking pain to having an intelligent conversation with your body, ensuring your efforts are healing, not harming.
Tennis Ball, Foam Roller or Massage Gun: Which Works Best for Upper Back Knots?
Choosing the right tool is less about which one is “best” and more about matching the tool’s mechanism to your specific goal and tissue type. A foam roller, a tennis ball, and a massage gun are not interchangeable; they affect the body in fundamentally different ways. Thinking of it as a toolbox, you wouldn’t use a sledgehammer for a finishing nail.
A foam roller is a broad tool, excellent for general fascial gliding and warming up large muscle groups like the lats or erector spinae. It works through broad, longitudinal pressure. A tennis or lacrosse ball offers more precision. It allows you to apply targeted, sustained pressure to a specific trigger point, ideal for knots in the rhomboids or upper trapezius. The key difference is moving from a general “sweep” to a pin-point “hold.”
The massage gun is in a category of its own. Its primary mechanism isn’t mechanical pressure alone; it’s neurological disruption. The rapid percussion scrambles pain signals being sent to the brain, essentially “tricking” the muscle into relaxing. Research confirms its unique power; studies have shown that percussive therapy devices can reach muscle depths of up to 60% more than traditional foam rolling. This makes it exceptionally effective for chronic holding patterns or muscles that are difficult to relax consciously.
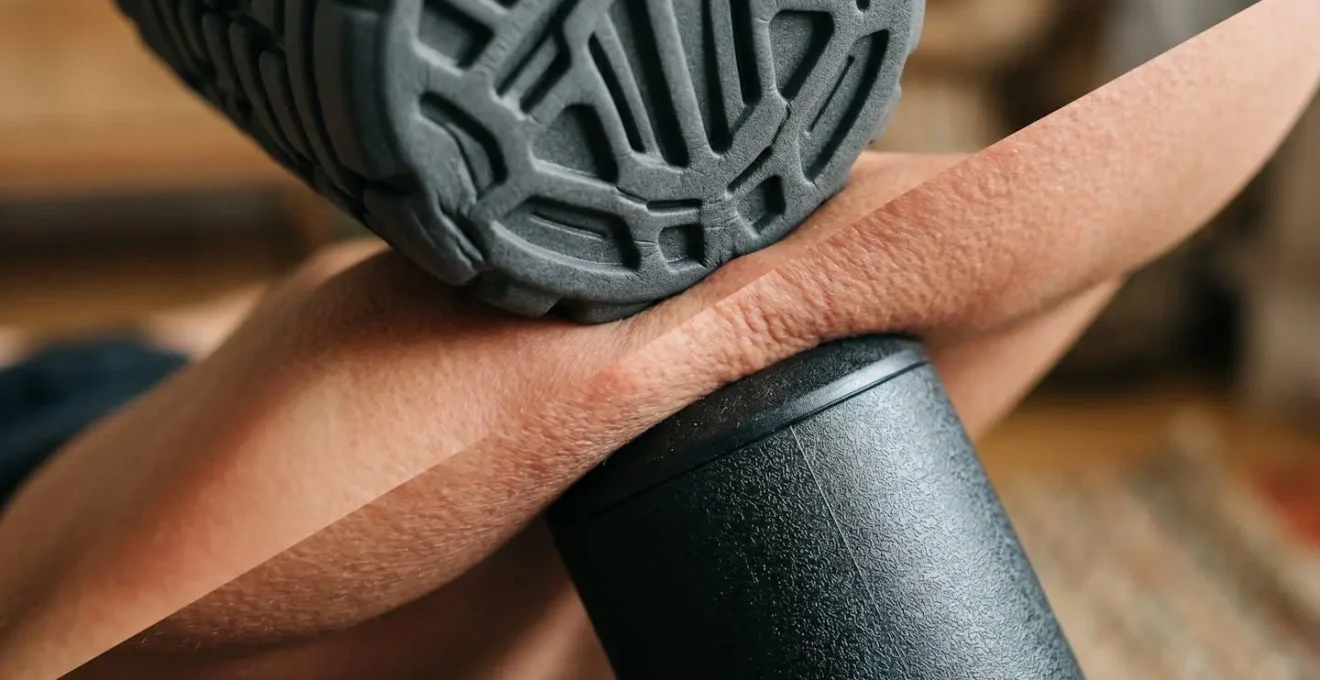
As the image illustrates, the contact points and tissue deformation are vastly different. The roller provides wide compression, while the percussive tool delivers focused, high-frequency oscillations. Understanding this distinction is key to effective use.
This table helps clarify when to reach for each tool:
| Tool | Best For | Mechanism | Surface Area | Muscle Type | Primary Effect |
|---|---|---|---|---|---|
| Foam Roller | General fascial gliding, warming up large areas | Mechanical Release via ischemic compression | Large (12-36 inches) | Erector spinae, quadriceps, IT band | Longitudinal pressure along muscle fibers |
| Tennis Ball | Broad, superficial knots | Mechanical Release with moderate pressure | Medium (2.5 inches diameter) | Upper trapezius, rhomboids (superficial) | Multi-directional pressure, gentler compression |
| Lacrosse Ball | Deep, pin-point knots requiring sustained pressure | Mechanical Release via deep ischemic compression | Small (2.5 inches, denser) | Infraspinatus, gluteus medius, piriformis | Targeted cross-fiber friction on smaller muscles |
| Massage Gun | Rapid neurological disruption, pre-workout activation, chronic holding patterns | Neurological Disruption via percussive action | Focused (attachment head size) | Hard-to-reach areas: upper back, shoulders, glutes | Scrambles pain signals to brain, tricking muscle into relaxing |
How Hard Should You Press on Trigger Points Without Causing Bruising?
The belief that self-massage must be painful to be effective is one of the most damaging myths in self-care. It leads to bruising, tissue damage, and a heightened sympathetic nervous system response (fight or flight), which creates more tension system-wide. The goal is not to obliterate the knot but to coax the nervous system into letting it go. It’s a negotiation, not a battle.
The single most reliable gauge for appropriate pressure is your breath. This isn’t a new-age suggestion; it’s a direct biofeedback mechanism. If you can maintain a slow, deep, diaphragmatic breath while applying pressure, you are in a therapeutic zone. The moment you gasp, hold your breath, or grimace, you’ve gone too far. That reflexive guarding is your nervous system screaming “threat!” and it will tighten the very muscle you’re trying to relax, completely negating your efforts. While it’s true that 68% of persons seeking massage therapy do it primarily for pain treatment, the path to relief is through finesse, not force.
The Breath Test: The Ultimate Pressure Gauge
A randomized controlled trial on individuals with tension headaches provides the ultimate proof. The study found that trigger point massage significantly increased the participants’ pressure-pain threshold (their ability to tolerate pain) only when applied at a level where they could maintain slow, deep breathing. Critically, the researchers noted that excessive pressure—defined as pressure causing breath-holding or muscle guarding—produced no additional benefit and increased the risk of tissue damage. The simple act of monitoring the breath emerged as the most effective tool to guide pressure, ensuring the body stayed in a parasympathetic (rest and digest) state conducive to healing.
Instead of aiming for a 10/10 on the pain scale, aim for a 5-7/10 intensity—a level of deep, satisfying ache that you can breathe into and that feels productive. Hold the pressure steadily until you feel the tissue begin to soften or the intensity of the sensation decrease, which typically takes 30-90 seconds. Then, slowly release. This approach respects your body’s signals and fosters genuine release rather than just creating more inflammation.
Should You Foam Roll Before or After Your Yoga Practice for Best Results?
The question of whether to foam roll before or after a workout isn’t a simple “either/or” answer. The timing depends entirely on your objective. Using the same rolling technique for both warm-up and cool-down is a common mistake that limits the potential benefits. To optimize your yoga practice, you should use two distinct rolling protocols: one for activation and one for recovery.
Pre-Yoga Rolling (Activation & Mobilization): The goal here is to increase blood flow, awaken proprioceptors (your body’s position sensors), and improve mobility without fatiguing the muscles. This calls for quick, dynamic, sweeping movements. Spend about 5-10 seconds on each major muscle group you’ll be using, like calves, hamstrings, and thoracic spine. The pressure should be moderate and the rhythm continuous. Think of it as a wake-up call for your tissues, preparing them for movement.
Post-Yoga Rolling (Recovery & Down-regulation): After your practice, the goal is the opposite. You want to shift your nervous system from the active, sympathetic state to the calm, parasympathetic “rest and digest” state. This is where you use slow, sustained pressure on any tight spots you identified during your poses. Hold each point for 30-90 seconds, pairing the pressure with deep, controlled exhalations. This encourages tissue repair and can reduce post-practice soreness. Indeed, a 2022 meta-analysis in Sports Medicine found a moderate effect of foam-rolling training on increasing range of motion, with longer-term protocols showing the best results.
Here’s a strategic protocol to follow:
- Pre-Yoga (Activation): Use quick, sweeping rolls (5-10 seconds) on major muscle groups. Keep pressure moderate to awaken tissue.
- Post-Yoga (Recovery): Use slow, sustained holds (30-90 seconds) on tight spots. Pair with deep breathing to calm the nervous system.
- Pose-Specific (Strategic): Before practice, identify a pose limited by tightness (e.g., tight pecs limiting Cow Face Pose arms). Spend 2-3 minutes using a ball on those tight pectoral muscles to neurologically inhibit them, making the pose more accessible.
By tailoring your rolling technique to your timing, you transform a generic habit into a strategic tool that actively enhances your yoga practice and accelerates recovery.
How to Address Desk Worker Tension Spots in Under 10 Minutes Daily?
For the millions of office workers, the chronic “mouse shoulder” and neck tension feels inevitable. The problem is rooted in a predictable postural pattern: a forward head, rounded shoulders, and a tucked pelvis from hours of sitting. Simply rolling the sore upper back and neck is a losing battle because it ignores the front of the body that’s pulling you into that position. The annual prevalence of neck pain in office workers varies from 42% to 63%, a statistic that highlights the failure of conventional stretching alone.
A truly effective routine must follow a “Release-Activate-Reposition” sequence. First, you release the chronically tight muscles in the front (like the pectorals). Second, you activate the weak, inhibited muscles in the back (like the lower trapezius and deep neck flexors). Finally, you reposition your body by addressing the foundation of the issue—the hips and glutes. This can all be done in under 10 minutes.

This image shows a perfect example of the “Release” phase. Using a wall or doorframe to release the pectoral muscles is a crucial first step that can be done right in the office, without any special equipment. It directly counteracts the forward pull of the shoulders.
Your 10-Minute Corrective Action Plan for Desk-Induced Tension
- Minutes 0-3 (Release): Stand in a doorway or at a wall corner. Place a tennis ball on your pectoral muscles (chest) and lean into it for 1 minute per side to release the muscles pulling your shoulders forward. Then, use the ball against the wall on your upper trapezius (top of the shoulder) for 30 seconds each side.
- Minutes 3-6 (Activate): Perform wall slides. Stand with your back against a wall, arms in a “goalpost” position. Slide your arms up the wall, focusing on feeling the muscles between your shoulder blades engage. Do 10 slow reps. Follow with 10 chin tucks, holding each for 5 seconds, to activate the deep neck flexors.
- Minutes 6-9 (Reposition): Address the kinetic chain. Perform a standing hip flexor stretch for 30 seconds per side. Then, do 15 glute bridges (or standing glute squeezes if you’re at the office) to wake up the muscles that support your pelvis and take the strain off your upper body.
- Minute 9-10 (Integrate): Stand up tall, reset your posture. Feel the new space in your chest and the activation in your back. Take a few deep, diaphragmatic breaths to lock in the new pattern.
- Micro-dosing Alternative: For even better results, break this down. Every hour, do a 1-minute pec release in a doorway and 5 chin tucks. This prevents tension from accumulating in the first place, which is far more effective than trying to undo 8 hours of damage at the end of the day.
How Can You Tell if Your Tightness Is Muscle, Fascia or Nerve Tension?
One of the biggest reasons self-treatment fails is misdiagnosis. You’re treating a nerve issue with a muscle technique, or a fascial restriction with a simple stretch. Muscle, fascia, and nerves are part of an interconnected web, but they have distinct properties and respond to different inputs. Learning to differentiate their signals is the foundation of effective self-care.
The Neuro-Myofascial Web: Dr. Janet Travell’s Discovery
The concept that you can’t treat these systems in isolation was pioneered by Dr. Janet Travell, the physician who first mapped trigger points. In her work, she discovered that a chronically tight muscle (myo) inevitably creates pulls in its surrounding connective tissue wrapper (fascia), which can then compress or irritate a nearby nerve (neuro). This “neuro-myofascial web” concept explains why simply stretching a “tight” hamstring often fails if the root cause is a fascial adhesion or a nerve tension pattern. The goal is not to isolate one tissue, but to identify the primary driver of the symptom within the interconnected system.
You can become a better detective of your own body by paying attention to three key factors: sensation quality, location pattern, and response to stimuli like heat and stretching.
- Muscle tension typically feels deep, achy, and dull. It’s localized to the belly of the muscle and responds well to heat and gentle massage.
- Fascial restriction often feels “sticky,” “stuck,” or like a line of tension. It requires slow, sustained, multi-directional pressure to release and responds best to holds of 60-90 seconds.
- Nerve tension is the one to be most cautious with. It presents as sharp, burning, tingling, or electric. The sensation travels along a defined nerve path (e.g., down the arm or leg) and is often worsened by stretching into the end range or applying direct pressure.
This diagnostic table provides a simple self-triage checklist to help you identify the likely source of your discomfort:
| Tissue Type | Sensation Quality | Location Pattern | Response to Heat | Response to Massage | Behavior with Stretching |
|---|---|---|---|---|---|
| Muscle | Deep, achy, dull | Localized to muscle belly | Improves with heat | Improves with gentle massage | Gradual improvement with gentle stretching |
| Fascia | Sticky, stuck, line of tension | Linear pattern following fascial planes | Variable response | Responds to slow, sustained, multi-directional pressure | Requires sustained holds (60-90 seconds) to release |
| Nerve | Sharp, burning, tingling, electric | Travels along defined nerve path | Little to no improvement | May worsen with direct pressure | Often worsens with stretching into end range |
Do You Really Need All Those Props or Can You Start With Just a Mat?
The wellness market is flooded with an intimidating array of self-massage tools, each promising miraculous results. While specialized props can be beneficial, the belief that you need a full arsenal to get started is a barrier to entry. The truth is, you can achieve significant relief with little to no financial investment. In fact, according to pain science research, most minor trigger points are self-treatable, and you can often get more relief from effective self-massage than from a passive session with a therapist.
The most powerful and versatile prop you own is your own environment. A simple wall or doorframe is one of the most effective tools for postural correction. You can use a corner for pectoral releases, a flat wall for thoracic spine mobility, and the floor for glute bridges. A rolled-up towel can provide cervical support or be placed under your spine for a gentle thoracic extension. These household items are not only free but are often safer for beginners as they provide less intense pressure.
A “Good-Better-Best” hierarchy can help you build your toolkit intelligently as your needs evolve:
- GOOD (Free/Household): A wall corner, a rolled-up towel, or a frozen water bottle for plantar fasciitis. These are perfect for starting out and learning your body’s patterns.
- BETTER (Budget-Friendly): A simple tennis ball ($3) offers more targeted pressure than a towel. A standard foam roller ($15) is great for large muscle groups. This level is sufficient for most people’s general tension needs.
- BEST (Dedicated Tools): A dense lacrosse ball ($5) provides the necessary pressure for deep, stubborn knots. A high-density foam roller ($30+) offers durability. This level is for those who have mastered the basics and require more specific interventions.
The most important tool is not the prop itself, but your knowledge of how to use it. Start with what you have. Master the techniques with a simple tennis ball and a wall. Once you understand the principles of release, activation, and repositioning, you’ll know exactly which specialized tools, if any, will actually benefit you.
Key Takeaways
- Your neck is often the symptom, not the source of the pain; look to postural imbalances, especially tight chest muscles and weak back muscles.
- Use the “breath test” as your ultimate pressure gauge: if you can’t maintain a slow, deep breath, the pressure is too intense and counterproductive.
- Adopt a “Release-Activate-Reposition” strategy: release tight muscles in the front, activate weak muscles in the back, and reposition your posture.
How to Choose Between Sports Massage and Deep Tissue When You Have Chronic Back Pain?
There comes a point where self-treatment reaches its limit, and seeking professional help is the smartest next step. However, navigating the world of massage therapy can be confusing. “Deep tissue” and “sports massage” are often used interchangeably, but they have different goals and approaches. Choosing the right modality—and more importantly, the right therapist—is crucial for resolving chronic pain rather than just getting a temporary reprieve.
Deep Tissue Massage focuses on chronic postural patterns and releasing adhesions in the deeper layers of muscle and connective tissue. The strokes are slow and the pressure is sustained to access these layers. It’s ideal for long-standing tension from a sedentary lifestyle or poor posture. Sports Massage, on the other hand, is goal-oriented towards function and performance. It often incorporates movement, stretching, and targeted techniques to address pain related to specific activities. For chronic back pain not caused by a specific sport, a diagnostically-driven approach like Clinical or Neuromuscular Therapy is often the most effective, as it specifically aims to find and treat the source of the pain.
| Modality | Primary Goal | Approach | Best For | Typical Session Elements |
|---|---|---|---|---|
| Sports Massage | Function & Performance Optimization | Dynamic, incorporates movement and targeted stretching | Athletes, active individuals with pain related to specific sports/activities | Pre/post-event protocols, muscle activation, performance enhancement techniques |
| Deep Tissue | Postural Patterns & Chronic Adhesions | Slow, sustained pressure on chronic adhered tissue layers | Chronic pain from poor posture, sedentary lifestyle, long-standing tension | Layer-by-layer release, focus on fascia and muscle belly adhesions, postural correction |
| Clinical/Medical Massage (Neuromuscular Therapy) | Diagnostic Pain Resolution | Diagnostically driven, treats pain source specifically | Chronic non-specific pain, trigger point referral patterns, nerve compression | Trigger point therapy, nerve gliding, specific muscular imbalance correction, pain mapping |
Ultimately, the therapist’s expertise is more important than the modality’s name. A great therapist will conduct a thorough assessment before you even get on the table. To find such a professional, you must become an educated consumer. Go into your first appointment armed with questions that vet their diagnostic skills.
Questions to Vet Your Next Massage Therapist
- “What’s your approach to chronic lower back pain in someone who sits all day?” Listen for answers that include assessing hip flexors, glute weakness, and the entire kinetic chain. A red flag is a generic answer about “relaxing tight muscles” without a diagnostic framework.
- “How do you differentiate between gluteal pain and true sciatic nerve pain?” A knowledgeable therapist will discuss trigger point referral patterns (like from the piriformis muscle) versus true nerve compression originating from the spine. A red flag is assuming all radiating leg pain is “sciatica.”
- “What recent continuing education have you completed in pain management or neuromuscular therapy?” Look for a commitment to ongoing learning and specific certifications beyond their initial training. A red flag is no specialized training in the last several years.
- “Can you outline a potential treatment plan for my condition over multiple sessions?” A skilled therapist should be able to describe a progressive approach that includes assessment, treatment, and reassessment, with clear goals. A red flag is suggesting the exact same treatment every single session regardless of your progress.
By arming yourself with this knowledge, you transform from a passive recipient of treatment to an active partner in your own healing. Take these questions, find a therapist who can answer them with confidence and clarity, and begin the journey to lasting relief.