Contrary to popular belief, mastering a yoga pose isn’t about achieving a perfect external shape. It’s about developing sensory intelligence to feel how a millimeter-sized adjustment creates a cascade of stability through your entire body. The real transformation is internal, not visual, turning mechanical movements into a profound proprioceptive dialogue.
You hold Warrior II, just like you have hundreds of times before. Your teacher offers a seemingly insignificant cue: “Rotate your front thigh outward, just a few degrees.” You comply, and suddenly, the entire pose transforms. The strain in your knee vanishes, your hips feel open, and a line of energy shoots from your back foot to your fingertips. It’s a moment of revelation. How can such a tiny movement—a shift of mere centimeters—radically alter the entire experience of a posture you thought you knew?
Many practitioners chase the external form of a pose, believing that flexibility and strength are the primary goals. They focus on common cues like “engage your core” or “go deeper,” yet still feel unstable or encounter recurring discomfort. This approach misses the fundamental secret of a sophisticated practice: the art of the micro-adjustment. The magic isn’t in the grand gestures but in the subtle, intelligent shifts that realign your entire kinetic chain, transforming a pose from a static shape into a dynamic, integrated system of support.
This isn’t about becoming a perfectionist. It’s about becoming a scientist of your own body. It’s about understanding the “why” behind the “what”—why a 5-degree rotation matters, how to feel the difference between productive engagement and counterproductive tension, and how to build an internal GPS for alignment that serves you long after you’ve rolled up your mat. This guide will deconstruct these subtle mechanics, giving you the tools to move beyond imitation and into a state of true embodiment.
This article explores the profound impact of these small corrections. We will break down the biomechanics, teach you how to develop your own internal awareness, and provide frameworks to make every pose more stable, safe, and powerful.
Contents: The Power of a 2cm Shift in Yoga
- What Happens to Your Knee When You Rotate Your Thigh 5 Degrees Outward in Warrior?
- How to Notice Your Own Misalignments Before Your Teacher Corrects You?
- Which Micro-Adjustments Protect Your Lower Back Versus Those That Just Look Better?
- When Perfectionist Adjustments Create More Tension Than They Solve
- How to Create Your Own 3-Point Alignment Checklist for Your Weakest Poses?
- Are You Engaging Your Legs or Just Gripping? How to Tell the Difference in Triangle Pose
- How to Add Balance Challenges to Sun Salutations Without Breaking the Flow?
- Why Does Your Warrior II Still Feel Unstable After 2 Years of Regular Practice?
What Happens to Your Knee When You Rotate Your Thigh 5 Degrees Outward in Warrior?
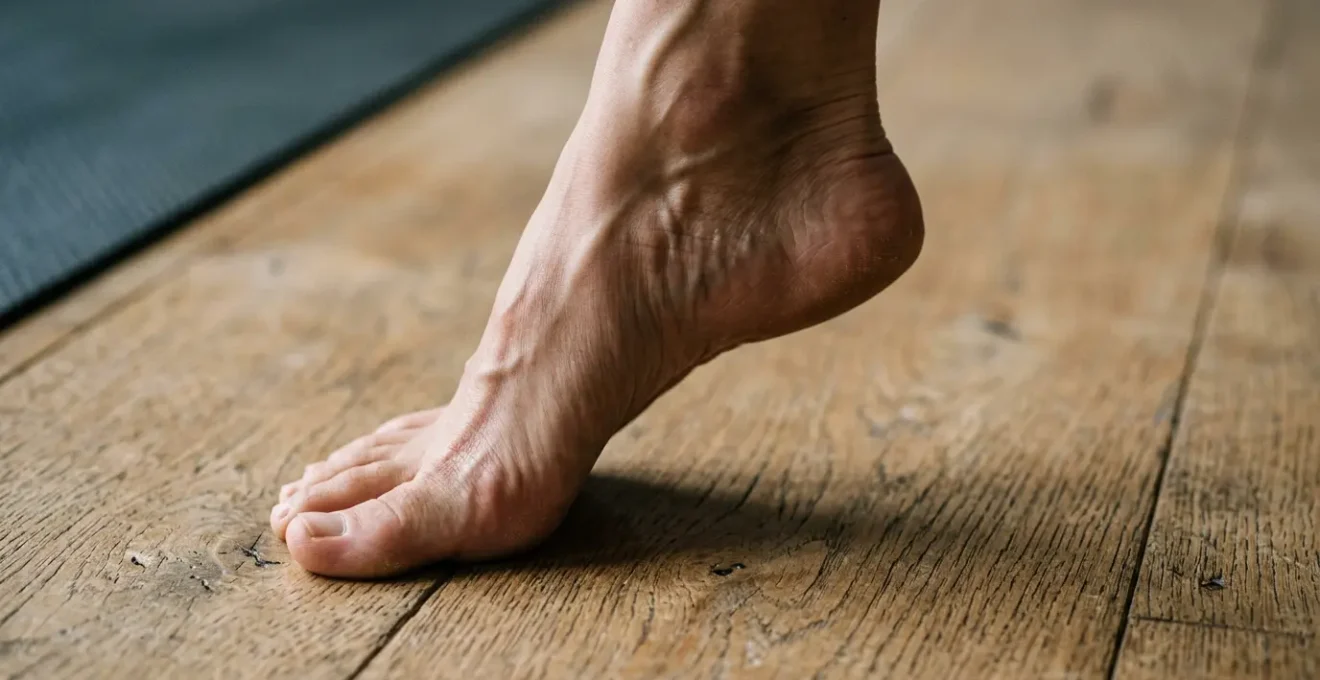
The knee is a hinge joint, designed primarily for flexion and extension, not for significant rotation. When your front knee collapses inward in a pose like Warrior II, it’s not the knee itself that’s failing; it’s a symptom of misalignment originating at the hip. The knee is caught in the crossfire of a poorly managed kinetic chain. That small, 5-degree outward rotation of the thigh isn’t just a knee correction—it’s a hip command. This micro-movement asks the external rotators of the hip to fire, pulling the head of the femur back into its socket and aligning the entire leg bone structure.
This single action creates a cascade of benefits. First, it aligns the patella (kneecap) with the center of the ankle, distributing force evenly across the joint and preventing the grinding pressure that leads to pain and long-term wear. Second, it creates an energetic line of stability from the outer edge of your foot all the way up to your pelvic floor. You are no longer just “holding” a pose; you are actively building a stable architectural structure from the ground up. The sensation shifts from precarious strain to integrated power. As anatomy expert Dr. Ray Long points out, this is a highly specific muscular action:
If you notice a tendency for your front knee to drift inward in Warrior II Pose, counteract this by engaging the sartorius and tensor fascia lata.
– Dr. Ray Long, Yoga Journal – Warrior 2 Pose: How to Practice Virabhadrasana II
This demonstrates that the feeling of stability is not abstract; it’s the direct result of targeted muscular engagement that begins with a tiny, intelligent rotation at the hip. This is the first step in developing true sensory intelligence.
How to Notice Your Own Misalignments Before Your Teacher Corrects You?
The ability to self-correct is rooted in proprioception—your body’s internal sense of its position in space. It’s the silent awareness that allows you to touch your nose with your eyes closed. While a teacher’s correction is invaluable, the ultimate goal is to cultivate your own internal teacher. This begins by shifting your focus from the external “look” of the pose to the internal “feel.” Are you listening for sensation, or just waiting for instruction? Developing this skill isn’t mystical; it’s a trainable form of sensory intelligence, much like learning a new language.
The practice of mindful movement is scientifically proven to enhance this internal GPS. It forces you to build a more detailed map of your body in your brain, refining your ability to detect subtle shifts in weight, joint pressure, and muscular activation. This heightened awareness is not just for yoga; it has profound real-world benefits, as shown in clinical settings.
Case Study: Yoga Meditation Enhances Proprioception in Parkinson’s Disease
In a study comparing a 12-week yoga meditation program to standard proprioceptive training, the results were striking. A study in the National Library of Medicine highlighted that the yoga group showed significant improvements in balance and joint kinesthesia compared to the group doing conventional exercises. This demonstrates that yoga’s mindful approach enhances internal body awareness more effectively than methods that focus purely on physical mechanics.
To start building this self-awareness, you must practice a systematic method of internal scanning. Instead of just holding a pose, you actively investigate it with your mind, asking specific questions and learning to decode the feedback your body is constantly providing.
Your Action Plan: Building Proprioceptive Awareness Through Body Scanning
- Begin in a static pose with your eyes closed to eliminate visual feedback and heighten internal sensing.
- Systematically scan from your extremities inward, asking specific questions: “Where is my weight distributed on my feet—front, back, inside, or outside edge?”
- Notice joint compression or spaciousness: “Can I feel an opening in my hip socket, or does it feel compressed and restricted?”
- Differentiate sensations: A “dull, broad stretch” is productive, whereas a “sharp, pinching, or electric zing” is a clear warning signal.
- Use instability as diagnostic feedback. Wobbles indicate misalignment in your base of support or center of gravity; make micro-adjustments to find stillness.
Which Micro-Adjustments Protect Your Lower Back Versus Those That Just Look Better?
In the world of yoga, not all adjustments are created equal. A common pitfall is chasing aesthetic alignment—the version of a pose that looks deep, flexible, and impressive—at the expense of functional alignment, which prioritizes joint safety and long-term health. Nowhere is this distinction more critical than in protecting the lower back. Forcing a deep backbend or an exaggerated spinal twist might look good on Instagram, but it often involves “dumping” into the lumbar spine, compressing the vertebrae and creating strain.
A truly protective micro-adjustment for the lower back often involves doing *less*. For example, instead of arching the back to “open the heart” in Upward-Facing Dog, the functional cue is to engage the core as a 360-degree canister. This involves subtly drawing the front ribs in, firming the glutes, and creating a supportive corset that lengthens the spine rather than compressing it. This adjustment might make the pose look less dramatic, but it transforms it from a source of strain into a tool for building core strength and spinal integrity. As research confirms, the benefits of yoga for back pain come from this integrated approach.
This is where the concept of a neutral pelvis becomes your most powerful tool. It’s the foundational adjustment that protects your spine in almost every pose, from standing postures to inversions.
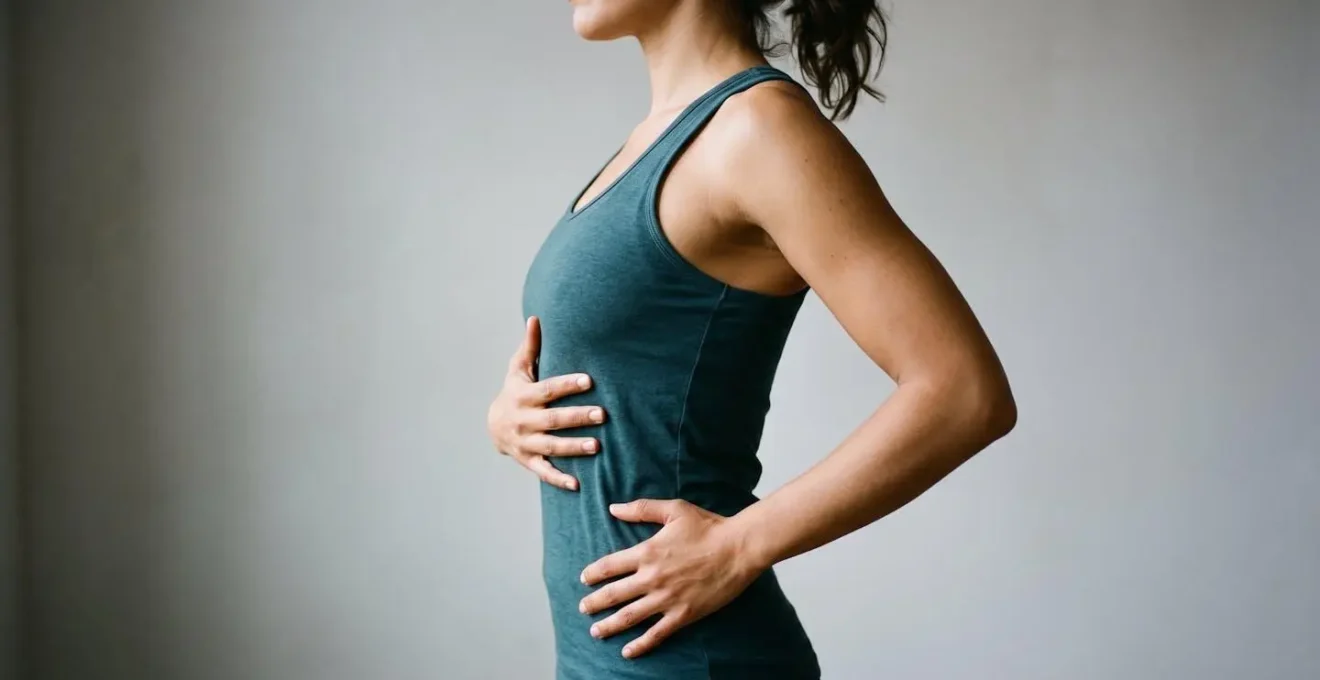
As this image illustrates, a neutral pelvis isn’t about flattening your back or tucking your tailbone excessively. It’s about finding the middle ground where your core can provide 360-degree support, creating space between the vertebrae. A study in the journal PLOS One reinforces this, explaining that pain reduction in yoga comes from improved body awareness and the posture control gained through practice, not just flexibility.
When Perfectionist Adjustments Create More Tension Than They Solve
The pursuit of perfect alignment can paradoxically become the very thing that sabotages your practice. When you become overly analytical, constantly fidgeting and micro-managing every muscle, you risk creating a state of hyper-vigilance. This mental state keeps your nervous system locked in a sympathetic “fight-or-flight” response, characterized by muscular gripping, shallow breathing, and mental anxiety. You are fighting the pose, not inhabiting it. The goal of asana is often the opposite: to guide the body into a parasympathetic “rest-and-digest” state, where true release and healing can occur.
An adjustment becomes counterproductive when the effort to achieve it creates more tension than it resolves. If you are clenching your jaw, holding your breath, or feeling your shoulders creep up to your ears while trying to “fix” your alignment, you’ve crossed a line. The quest for a flawless external shape has overridden the primary purpose of the practice—to create a sense of ease and spaciousness. True transformation happens when the brain feels safe enough to let go.
Hyper-vigilant adjusting keeps the nervous system in a sympathetic ‘fight-or-flight’ state, characterized by analysis and muscular gripping. The goal of asana is often to access the parasympathetic ‘rest-and-digest’ state. A ‘good enough’ alignment allows the brain to feel safe and let go, which is the real transformation.
– Yoga & Pain Science Integration, International Journal of Yoga – Safety and Prevention of Injuries
The science supports this. Letting go of rigid perfectionism has tangible, positive biochemical effects on the body, particularly on the fascial system, the connective tissue web that holds immense tension.
Case Study: The Impact of Relaxation on Fascial Tension
Research on restorative yoga practices shows that stimulating the parasympathetic nervous system through breathwork and relaxation reduces inflammatory markers (cytokines) and increases the pH level of the fascia. This biochemical shift makes the connective tissue more fluid and less tense. This proves that letting go of rigid, perfectionistic adjustments and embracing relaxation can create more therapeutic benefit than muscularly forcing a “perfect” shape.
How to Create Your Own 3-Point Alignment Checklist for Your Weakest Poses?
Every practitioner has their “nemesis” poses—the ones that feel awkward, unstable, or inaccessible. Instead of avoiding them or forcing your way through, you can deconstruct them using a simple, personalized framework. Creating a 3-point checklist for these poses transforms confusion into a clear plan of action. It gives you a consistent mental script to run through each time, focusing your attention on the most critical actions rather than getting lost in a dozen minor details.
This isn’t about memorizing generic cues from a book; it’s about identifying the three most impactful actions for *your* body in that specific pose. For one person in Warrior III, the key might be grounding the standing foot; for another, it might be engaging the glute of the lifted leg. This process empowers you to become your own teacher, building a practice that is intelligent, personal, and effective. The “Foundation, Action, Expression” framework is a powerful tool for creating these personal checklists.
By breaking any pose down into these three core components, you create a logical sequence that builds the posture from the ground up in a way that is both stable and sustainable.
The Foundation, Action, Expression Framework
- Point 1 – Foundation: Identify what is touching the ground and how it’s active. This is your anchor. Is your weight evenly distributed? Are you actively pressing down to create lift? Example: ‘Ground through all four corners of both feet with arches lifted’ or ‘Press the outer edge of the back foot firmly into the mat as an anchor.’
- Point 2 – Action: Define the primary energetic line or muscular task of the pose. This is the core work. Where does the main effort need to be directed to stabilize and support the structure? Example: ‘Externally rotate the front thigh from the hip socket to stabilize the knee’ or ‘Engage the transverse abdominis to create 360° core support.’
- Point 3 – Expression: Determine where you can soften to complete the pose. Once the foundation and action are set, where can you release unnecessary tension? This is where ease enters the effort. Example: ‘Relax the jaw and soften the gaze to a fixed drishti point’ or ‘Allow the breath to expand the ribcage while maintaining core engagement.’
Are You Engaging Your Legs or Just Gripping? How to Tell the Difference in Triangle Pose
In a pose like Trikonasana (Triangle Pose), the instruction to “engage your legs” is fundamental. Yet, many practitioners mistake intense muscular gripping for true engagement. Gripping is a brute-force effort; it’s characterized by rigidity, tension in the joints, and restricted breath. It’s like clenching your fist as hard as you can—the muscles are active, but they are also locked and immobile. True engagement, on the other hand, is intelligent and dynamic. It feels like a “radiant hum” of energy, creating stability without sacrificing spaciousness. It’s an isometric contraction that supports the joints rather than compressing them.
How can you tell the difference in your own body? The distinction lies in the quality of the sensation and the freedom of movement elsewhere. Gripping in the feet and legs often leads to a feeling of being “stuck” or “clamped down.” Your toes might be white-knuckled against the mat, and you may find it difficult to breathe deeply into your torso. True engagement creates the opposite feeling: a sense of being pulled *up* from the ground, with energy radiating through the legs to support a light and open upper body. Luckily, there are simple diagnostic tests you can perform mid-pose to cultivate this sensory intelligence.
These tests shift your awareness from what the pose looks like to how it functions internally, providing immediate, tangible feedback on the quality of your effort.
Diagnostic Tests for Engagement vs. Gripping
- The Toe Wiggle Test: In Triangle Pose, try to lift and wiggle the toes of your front foot. If you can do it easily, it means you are using the arches of your feet and the larger muscles of your legs for support (true engagement). If your toes are locked down and you can’t lift them, you are likely gripping with your feet and collapsing into your joints.
- Radiant Hum vs. Clamped Block: Pay attention to the overall sensation. True engagement feels like a continuous, vibrant energy—a ‘radiant hum’ that allows breath to flow freely. Gripping feels like a hard, restrictive ‘clamp,’ often accompanied by sharp tension at the joints and a feeling that your breath is blocked.
- Isometric vs. Concentric Contraction: In static holds like Triangle, proper engagement is an isometric contraction—muscles are active without changing length, creating stability. Gripping is an overzealous concentric contraction, where muscles shorten and harden, fighting the posture rather than supporting it.
How to Add Balance Challenges to Sun Salutations Without Breaking the Flow?
Sun Salutations (Surya Namaskar) are the heartbeat of a vinyasa practice—a moving meditation that links breath to movement. After a while, the sequence can become automatic, and the mind may begin to wander. Introducing micro-challenges to your balance within the flow is a powerful way to bring your attention back to the present moment. It re-engages your proprioceptive system and transforms a familiar routine into a laboratory for exploring stability. The key is to do it without disrupting the rhythm and grace of the flow.
This isn’t about adding complex arm balances or holding poses for minutes on end. It’s about finding the “in-between” moments—the transitions—and intentionally making them a point of focus. Instead of rushing from Downward Dog to a lunge, you can create a “proprioceptive pause,” a moment of suspended animation that forces your core and stabilizing muscles to fire in a new way. These small additions demand a higher level of sensory intelligence and body control. The effectiveness of yoga in improving this internal sense of balance is well-documented, with studies consistently showing its positive impact.
In fact, the consistent finding from a 2023 systematic review of studies was a positive improvement in joint position sense (JPS) following yogic interventions. You can leverage this by weaving specific, advanced techniques into your vinyasa.
Advanced Balance Integrations for Vinyasa Flow
- Floating Transitions: When stepping forward from Downward Dog into a lunge, don’t immediately place the foot down. Instead, bring your knee toward your chest and hover the foot an inch off the mat for a full breath cycle. This simple delay transforms a passive step into a powerful core and balance challenge.
- Proprioceptive Pauses: Add a one-second, intentional “freeze-frame” at the peak of a transition. For example, as you rise into High Lunge, pause just before your foot lands. Or in the moment before lifting off into Warrior III, find absolute stillness. These pauses recalibrate your nervous system and refine your control.
- Drishti Dynamics: Systematically change your gaze (drishti) to destabilize and then strengthen your balance. In the transition from a lunge to Warrior III, start by gazing at the floor. On the next round, find a fixed point ahead. For an advanced challenge, try tracking your moving hand with your eyes as you lift off.
Key Takeaways
- A tiny adjustment in one joint (like the hip) creates a positive chain reaction through the entire kinetic chain (like the knee).
- True alignment is functional (protects joints) not aesthetic (looks deep). Focus on the 360° core canister to protect your spine.
- Self-correction comes from proprioception—an internal “feel” for your body’s position. This is a trainable skill.
- Over-adjusting creates tension and keeps your nervous system in “fight-or-flight,” defeating the purpose of the practice.
- Engagement is a radiant, supportive energy; gripping is a rigid, restrictive clamping. Learn to feel the difference.
Why Does Your Warrior II Still Feel Unstable After 2 Years of Regular Practice?
If you’ve been practicing Warrior II for years and still feel wobbly, you are not alone. This common frustration almost never stems from a lack of strength or flexibility. It stems from a misunderstanding of where stability truly originates in the pose. Most practitioners focus on the front leg and the depth of the lunge, but the secret to unshakeable stability in Warrior II lies in the back leg. It is your anchor, your rudder, and the source of your power. When the back leg is passive, the entire pose is built on a weak foundation.
The feeling of instability is your body’s proprioceptive dialogue telling you that your base of support is not working as an integrated unit. Simply pressing the back foot into the mat isn’t enough. The micro-adjustment required is an energetic one: actively press the outer edge of the back foot down while simultaneously creating an isometric action of “scissoring” the thighs toward each other. This engages the adductors (inner thighs) and glutes, creating a powerful, stabilizing lock in the pelvis. It’s an internal action that is completely invisible from the outside but revolutionizes the feel of the pose from within.
As expert Dr. Ray Long explains, this isn’t just a feeling; it’s precise biomechanics at play.
Press the back foot into the ground and attempt to draw it toward the midline to activate the adductor magnus, which works with the gluteus maximus to extend your back hip and open the pelvis.
– Dr. Ray Long, Yoga Journal – Warrior 2 Biomechanics
This single internal action stops you from sinking into your hip joints and instead creates lift and power. You are no longer just holding a shape; you are actively managing opposing forces. Your front leg reaches forward while your back leg anchors you down and back. This dynamic tension is the source of effortless stability.
By shifting your focus from the external shape to these internal, intelligent micro-adjustments, you can finally unlock the stable, powerful, and integrated practice you’ve been seeking. To begin this journey, start by applying the 3-point checklist to your most challenging pose today.